HELP
In this section you will find answers to the most frequently asked questions about our services, processes, delivery times and customization options. If you do not find the information you are looking for, do not hesitate to contact us: our team will be happy to assist you and offer you a quick and efficient solution.

Solve your doubts easily

We know that questions may arise throughout the process, so we have gathered the most relevant information to help you better understand our services and how we work. In this section you will find clear explanations on the most frequent topics, designed to guide you and make each step easier. If after reading it you need more information, we will be happy to assist you personally.

- If you use design programs:

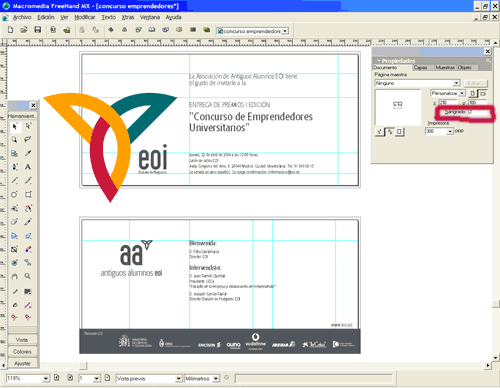
In the available options choose «pdfx3» or «pdf high quality or print»/In the bleed option put 3mm. and put the cut crosses.

Click on the program used to see how to make a printable pdf.

- If you use other programs:

Save as high quality pdf.

If you don't get it, try using an external program to generate pdfs:

We recommend dopdf because it is free and works very well.

http://www.dopdf.com/es/

It is installed as a virtual PDF printer, so it will appear in the list of printers and faxes.
Open a document, choose Print and select doPDF. It will prompt you where to save the PDF file and when finished, the PDF file will automatically open in your PDF viewer.

How do I check if my pdf is valid for printing?

If you deliver a work in pdf format, it is essential that meets the 3 minimum requirements, otherwise the pdf is not valid for quality printing.
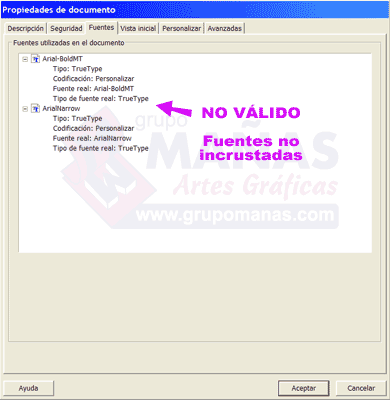
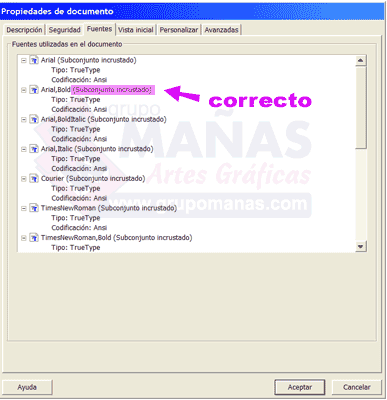
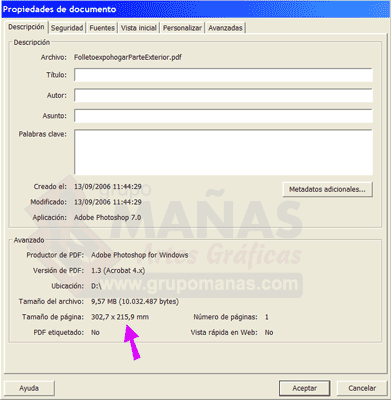
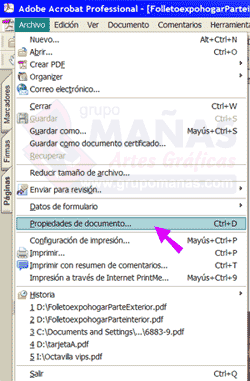
The following images show how to check the pdf in acrobat reader:

1 - Sources

(fonts) must be embedded.
Solution: to embed fonts you have to select the option «embed fonts».»
in the program you use to generate the pdfs.

2 - The size of the document must be correct.

(if it has blood on it, the document must be larger).

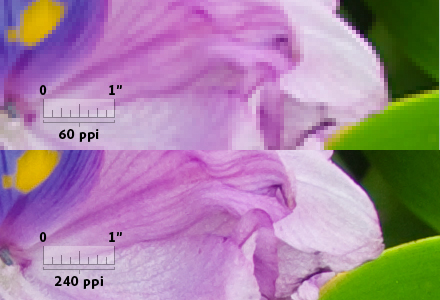
3 - The resolution of the images must be between 150 dpi. and 300 dpi.

The resolution is not listed in acrobat, the best way to check if the resolution of the images is good is to print on any printer.
If the images come out very pixelated (sawtooth) it is because the pdf has been made with less resolution or because the images you have used do not have enough resolution.
Please note that images downloaded from the internet have a very low resolution of 72dpi.

Minimum requirements to print a quality job.

We recommend following these guidelines in order to print a quality job.

If you do not know how to make these changes, you must authorize us to print your work. You assume the risk of obtaining a poorer quality result if you do not follow these instructions. You can also request a quotation for us to make the necessary changes (technically not always possible).

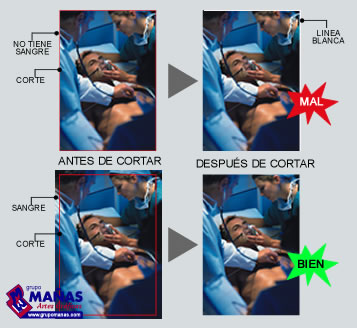
What is blood or bleeding?

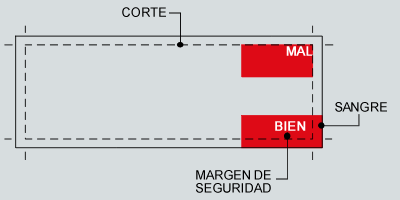
The bleed is the part of the illustration that is outside the clipping area.
It is included in the illustration as a margin of error, to ensure printing to the edge of the sheet. Depending on the printing system used, there may be a mismatch in the cut of up to 2mm.

The recommended indentation is 3 mm on each side (does not have to be exact).

How is the blood applied?

In photoshop the canvas and image content must be enlarged so that the image size already includes the bleed.

In the rest of the programs the blood must protrude outside the document.

If you are unable to make these modifications there are 2 possibilities:

  1. Cut 2 mm inward with the inconvenience of cutting text or graphics.
  2. Leave a blank space around (reducing the document).

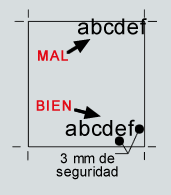
Safety separation

Chen texts or logos are close to the edges, they must be separated from the cut by at least 3 mm.. as they run the risk of being guillotine cut (the cut may vary slightly).

Document size

- The final size must match the size of the page.
(no manual crossings).

- In multi-page documents, they must be all in a row in the same document.
(do not make a document with each page or make assemblies).

The images

The optimum image resolution is 300 dpi.
Do not use images downloaded from the Internet as they are only 72 dpi.
Please note:

- Yes enlarge subsequently an image for example, at twice the size:
resolution would be reduced by half.

- Yes reduces subsequently an image for example, to half the size:
resolution would be doubled.

Colors:

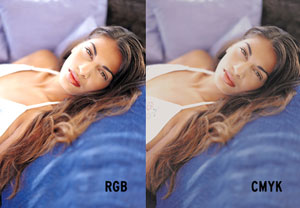
Our machines print in four-color process (CMYK) or with spot colors (PANTS). If you send us documents containing RGB colors, we convert them to CMYK with the inevitable color shift (the colors are not as bright).

The color you see on the screen is approximate.

- Four-color printing (CMYK):

Make sure that the images provided are in «CMYK» and never in «RGB».
(the conversion from rgb to cmyk leads to a color change in some cases noticeable).

- ICC color profiles

These are the color profiles used to comply with ISO 12647:

You have to use the appropriate profile according to the type of paper to be printed on:

  • Coated or coated paper (gloss or matte): FOGRA 39 or iso coated v2.
  • Uncoated paper (all other papers): FOGRA 29 or PSO_Uncoated_ISO12647
    If your design program doesn't have them included, you can download the profiles from here.

- Printing by direct colors (Pantone):

Pantone or spot color printing is used to achieve specific or corporate colors, which generally cannot be achieved in four-color printing.
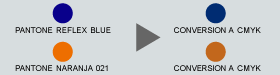
For example: a bright orange color cannot be reproduced by mixing the four main colors (cmyk) and must be printed as a pantone color.

Simulation of color change when printing pantone colors in cmyk

In your design program you must choose one of the following pantone guides depending on the paper that will be used to print your job:

- Coated paper: pantone solid coated

- Uncoated paper: pantone solid uncoated

The work must be prepared in a vector program (neither photoshop nor photopaint nor office).
Logos or any object must be drawn or in grayscale.
Images in rgb or cmyk (generally jpg, bmp, tiff...) are not valid.
If you use duotone images, the colors must match the colors you use in your design or layout program.

Color fidelity on your screen or printer

It is important to note that the colors you see on the screen are not the colors that are printed.

In order to see a pantone color there are pantone certified color guides.
In order to see a simulation of a cmyk print, you must request a color proof (variable fidelity depending on the final support to be printed on).

*In order to have a certain color fidelity, it must meet certain minimum requirements:
- The monitor must be perfectly calibrated by hardware with a colorimeter or spectrophotometer and special software.
- The setting of the software from which the test is viewed (acrobat, photoshop, etc.).
- The printer must be calibrated and use a rip that processes color correctly.

printed color proof is made to simulate the result of a job on a printing press. Due to technical differences, inks, paper type, etc. between the machine that performs the proof and the machine that prints the final job, it is not possible to guarantee that the proof is 100% reliable. It is therefore normal for color variations to be greater depending on the printing and proofing paper.
If the job includes pantone printing the color fidelity is only approximate and will be looked up in an official pantone color guide.

electronic color test (pdf or jpg) is not color-reliable, so it should only be considered as an approximation. The level of color fidelity displayed depends on many factors. Among them: the calibration of the monitor and the display software. If you need a more approximate proof it is necessary to view a printed proof.

VERY IMPORTANT:

NO assemblies of any kind of work (we impose it automatically).

DO NOT place hand-cut crosses, The size of the document must match the size of the page.

Triptychs DIN-A4

- Create an A4 size document with two pages and 3 mm bleed.
   *If created in photoshop, two images must be made with 3mm of blood on each side,
   so that the size of the image would be: 21.6×30.3 cms.

- Take into account the folds:

        outer face: the folded sizes are: 97mm and 197mm (the left blade is smaller than the others).

        inner side: the folds are: 100mm and 200 mm (the right blade is the smallest).

Catalogs, magazines, manuals, books

- Create a single document with the single pages followed by the order they should be in
(include white pages if necessary).

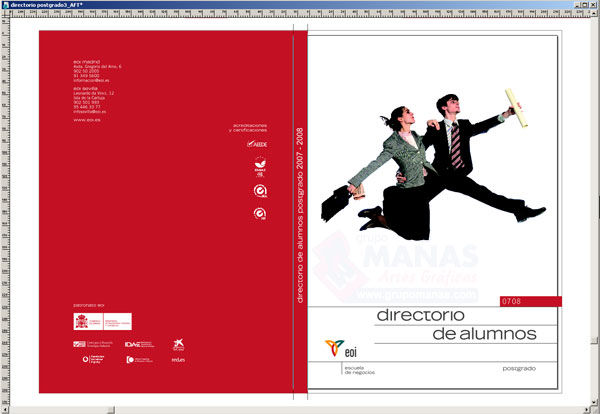
- If the cover has a spine, a separate document must be made, putting the front cover on the right and the back cover on the left and including the spine (consult spine width in case you do not know it).

Cards, letters and loose documents

- Create a document at the final size (blood goes on the outside).

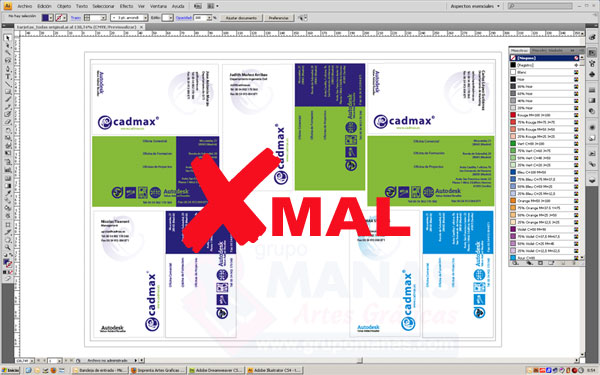
- If there are several models, add pages to the same document so that we have a document with several pages.

BAD - Do not merge all pages into a single document or make assemblies.

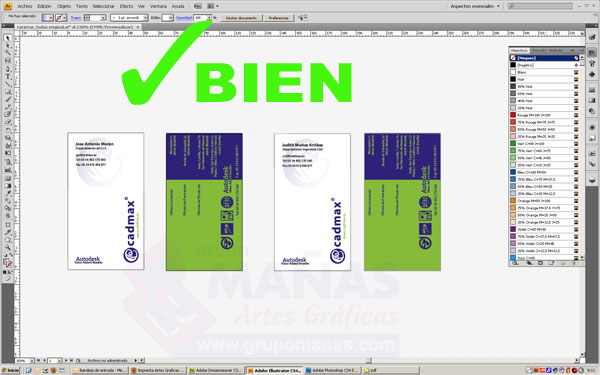
OK - 1 page for each card

Folders

- Create a document from the open folder (including spine if present).
We recommend downloading the template and working on it.

Envelopes and bags

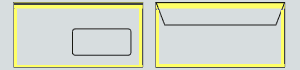
- You must leave 1 cm. blank all around.
This space is needed by the printing machine to hold the envelope.
We recommend downloading the template and working on it.

WE transfer (max. 2 gb.)

Myairbridgte (max. 20 gb.)

en_USEnglish